Showing posts with label simple diy flowers. Show all posts

Tuesday, April 15, 2014

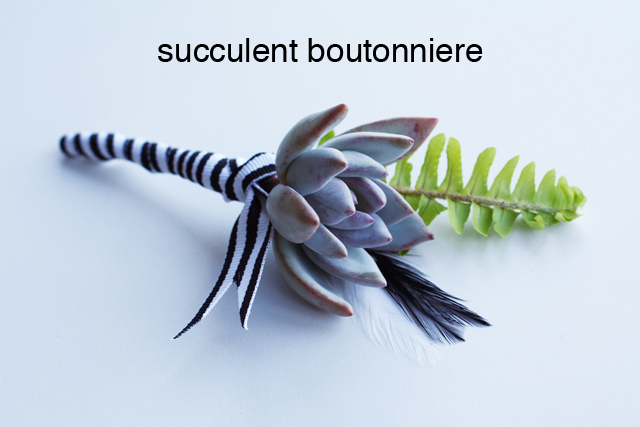
simple DIY flowers: succulent boutonniere

succulent boutonniere

i was a little silent last week (i was preparing for a very special bridal shower that took place this past weekend - look for the post in the next few weeks!).  but i'm back and continuing on with the simple wedding flowers series.  this time i decided to put together a super easy boutonniere.  i like boutonnieres that are clean looking and not too froufrou and i think that the guys appreciate this too.  i love the architectural look of succulents and they're great as cut plant material because they last a really long time.

succulent boutonniere materials

for this boutonniere i used only the three little bits above:  one piece of a succulent called echeveria elegance, one tiny fern frond (i removed most of the bottom leaves from the stem) and one little feather.
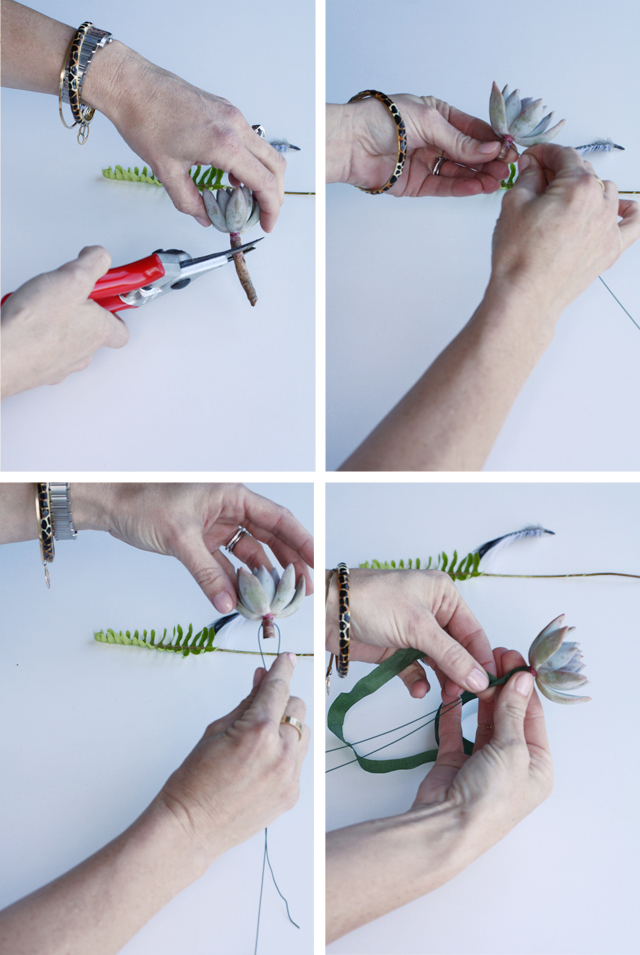
succulent prep

i prepared the succulent by 1) trimming the stem to about 1/2"  2) then sticking a 22 gauge floral wire through the remaining piece of stem 3) and folding it down on either side.  4) i then wrapped the stem and the wire with floral tape.
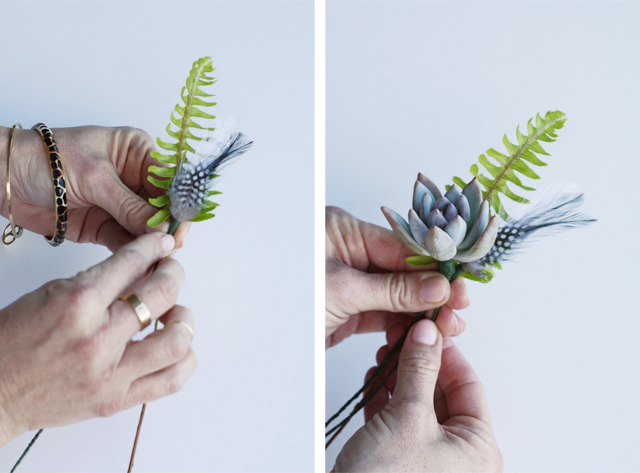
put together boutonniere

i put the fern and the feather together and placed the succulent on top...
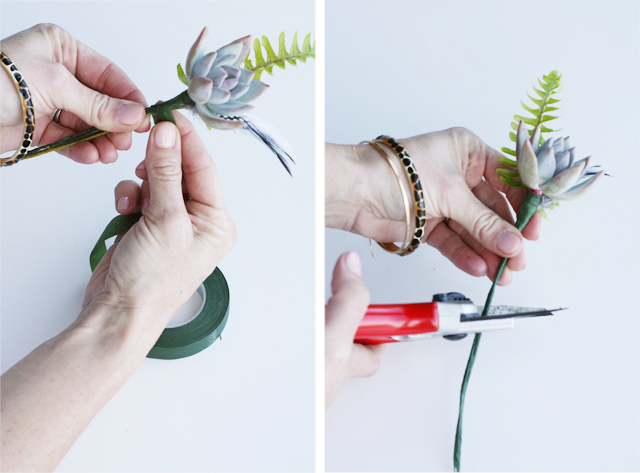
wrap & cut boutonniere

...then wrapped the whole thing with the tape and trimmed it to around 3 inches.
ribbon on boutonniere

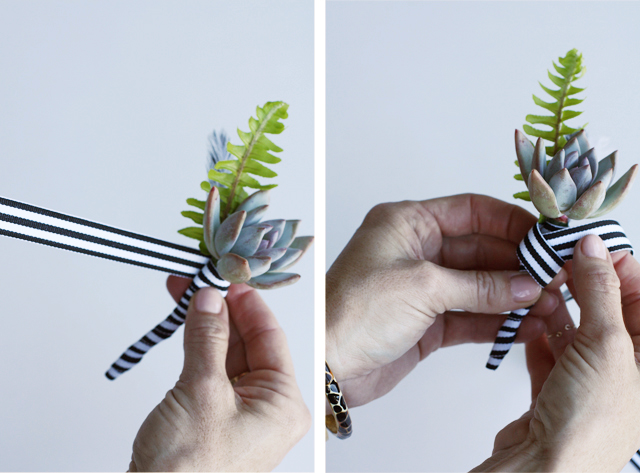
then came the ribbon.  i started at the bottom and wrapped the whole thing, covering all of the tape.  when i got to the top i left a little length of ribbon (about 4 inches) and then made a loop and put the loose end of the ribbon through it, pulling it tight.
completed succulent boutonniere 1

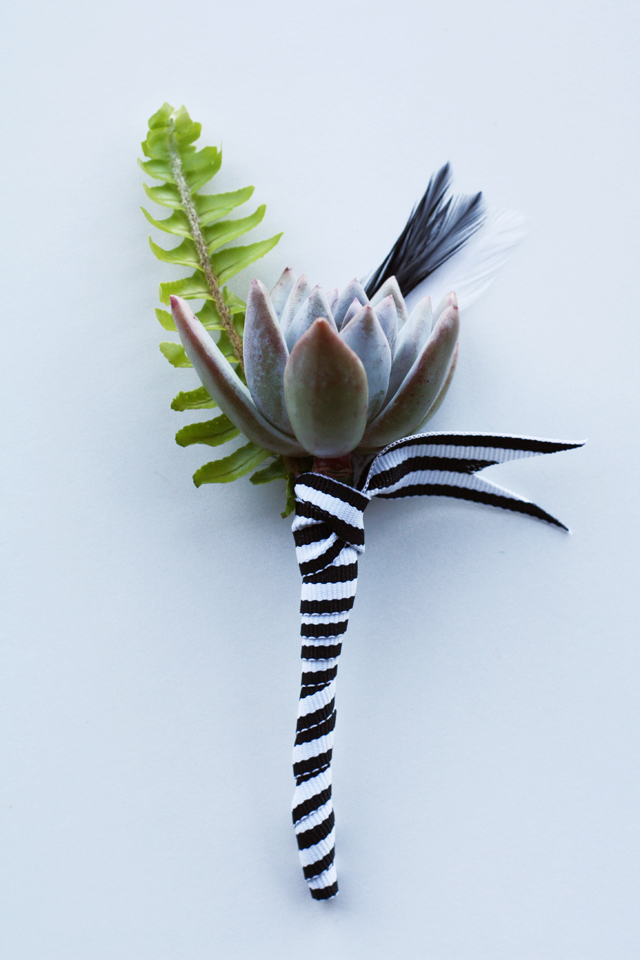
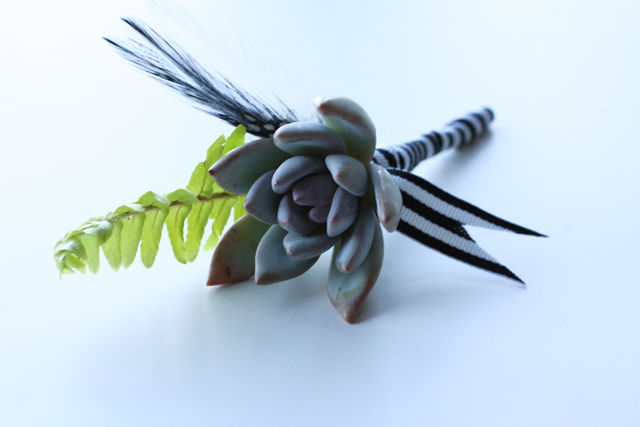
when i was done i cut a little dove tail in the ribbon.  that's it!
completed boutonniere 2

a handsome and simple boutonniere for a handsome (and hopefully not too simple) groom.  

happy wedding season!

xo, c

Thursday, March 13, 2014

simple DIY flowers: anemone bouquet

completed bouquet 1

wedding season is upon us so i thought that it would be fun to do a series of wedding flower posts.  

anemones

i've been loving anemones lately, so when i was at the flower mart looking for something to use in a bridal bouquet post and saw these lovely jewel toned numbers i knew that they were it.

sweet peas & spray roses

i chose these hot pink spray roses and deep purple sweet peas to complement the anemones.

begin bouquet

i removed most of the lateral branches from the spray roses so that they didn't create too much bulk.  then i started with a stem of the roses in the center and added a couple of anemones...

anemone bouquet 1

...then a stem of the  sweet peas.  then i gave the whole thing a little turn (for more on how to put together a hand-tied bouquet see this post).

twist bouquet

i continued on, adding flowers 2-3 at a time, making sure that i was keeping a rounded shape (looking in a mirror can help with this).

cut bouquet

when i was happy with the fullness of the bouquet, i trimmed the stems to the length that i wanted (i wanted a smallish bouquet so i trimmed them pretty short).  

completed vase bouquet

at this point, if your bouquet isn't for a wedding, you could just plop them in a vase...

tape bouquet

...OR, if you want this to be a hand-held bouquet, you can wrap the stems with floral tape.  the tape is stretchy and sticks to itself so it's pretty easy to work with.  i taped about 2 1/2 inches of the stems to keep the whole thing secure.

pin bouquet
i then took my ribbon (in this case black grosgrain but, as usual, use what works with your colors/style) and pinned it at the bottom of the taped area and wrapped it around until all of the tape was covered.  i then put two more pins in to keep the ribbon in place.

completed bouquet

after that i took another length of the ribbon and tied a bow around the bouquet, covering the pins.  and that was it!

anemones come in a variety of colors and i think that they have a chic and interesting look with their ruffly petals and their black centers.  consider them to add a bit of cool to a bridal (or any) bouquet.

xo, c

Wednesday, February 26, 2014

simple DIY flowers: multiple vessel flower display

multiple vessel flower display

one of the simplest ways to display flowers is by plopping a few blooms in a selection of vessels that are grouped together.  most of the work happens up front, in finding a group of vessels that will look good together.

IMG_2378

for this display i used a selection of white vases from west elm and ikea.  but there are lots of options for this type of display, and, as always on f + l, i encourage you to put your own spin on things.  vintage or recycled glass bottles would look great used in this way - you can find nice ones on places like etsy or luna bazaar).  but, really, the possibilities are endless.  the only suggestion that i would make is to find vases/vessels with small openings so that you only have to use 1 - 3 blooms in each.  this is mostly to keep it simple and quick, but i also think that it's a lovely way to spotlight the individual flowers.  the other thing to possibly think about is sticking with either similar color vases or flowers so that things don't get too busy - i chose vases in all white tones but used flowers in red and yellow shades.  other than that, have at it.

here's what i did:

IMG_2393 IMG_2400

i found these bee-you-tee-full flaming parrot tulips and they inspired the red and yellow color scheme (bummer they weren't quite open).

  parrot tulipsIMG_2394

i thought that the yellow daylilies and red hypericum berries complimented the pretty tulips nicely.

yellow daylily hypericum berry

this type of display would be lovely on a dresser or entryway table (as in the first picture, at the top of the page) or on a dining table (below).

IMG_2606

having a collection of vases like these at the ready is a pretty, quick and SIMPLE way to display your blooms.

xo, c

Tuesday, February 11, 2014

simple DIY flowers: valentine's day tulip arrangement

tulips valentine's day

when my husband wants to buy me flowers, instead of purchasing them pre-arranged, he'll usually pick up a few bunches of whatever is looking pretty and bring them home for me to arrange myself, knowing that it's something that i enjoy.  he did this last week, bringing home several bunches of lovely tulips in a variety of colors.  because this is such a sweet gesture of love, and love is what this week is all about, i thought that it would be perfect to use said tulips for a valentine's day post.

tulips are abounding around here (i just used them here) lately at flower shops and grocery stores, and they're a nice (and less expensive) alternative to roses for valentine's day.  i decided to use a method for arranging tulips that i learned at flower school new york this last summer.  it involves arranging the flowers on a table or other surface.  it can feel a little awkward at first if you're using a large quantity of blooms so this is a mini version - i used 21 tulips in total.

tulips

i used four different colors, but you could certainly use all one color.

lay out tulips

i started by laying the tulips out in a row - seven of them in this case.  many tulips naturally bend one way or the other, so i placed the ones bending to the right on the right, the ones to the left on the left and so forth.  i made sure that the flowers were evenly laid out by measuring them with my hand.

2nd row tulips

i continued on, making a second row of flowers on top of the first.

tulips completed

i made one more row - so three rows of  seven.

tulips grab together

then i grabbed them all at once...

tulips clear rubber band

...and put a clear rubber band around the stems (the kind you use for your hair), about half way up. 

tulips twist and cut

after the rubber band was in place, i twisted the part of the stems that were above the band to the left, while twisting the lower half to the right.  this creates a pretty spiral look to the stems that you can see through a glass vase. (note:  you should be a little tender while doing this because the stems can snap if you're too rough).  i trimmed the stems so that the flowers would sit just above the lip of the vase.

tulips in vase

because i chose a short glass cube vase, i moved the rubber band up the stems a bit so that it was secure.

*an interesting little tidbit about tulips is that they keep growing after they're cut and placed in water.  so they won't keep this compact look after a couple of days, but i think that a flower poking out here and there adds to their charm.

tulips valentine's day 2

i added a little hand stamped card and tied it on with some twine to finish it off.  i think that this would make a sweet little gift for a friend, a family member OR as a romantical type of thing ;-)

i hope that you'll find a way to spread the love this v-day, whether it's with flowers or some other gesture...because isn't that what it's really all about??

xo, c

Thursday, January 23, 2014

simple DIY (foraged) flowers: winter woodland arrangement

IMG_1890 copy

i've been intrigued lately by the idea of using foraged materials in arrangements (i talked a bit about it here).  laws for foraging on public lands vary widely (it seems that it's generally not allowed), but consider what you might have available to you in your own yard.  or maybe you have a neighbor who would be willing to give you permission to snip a few branches or blooms.  it really makes you see your surroundings differently - everything is a possible candidate for an arrangement.  

we happen to live on a very steep hillside that we rarely step foot on (it's that steep).  but the other day i was down there rounding up a collection of toys that my boys had tossed over our deck and i noticed several things that would be lovely for an arrangement.  so, snip, snip, snip i went.

IMG_1741

i found this lovely toyon (california holly).

IMG_1759

then a bit of california bay laurel and some fern fronds for greenery.

IMG_1726

and, lastly, some pretty lichen and moss covered oak branches.  i began by placing the branches in the vase.

IMG_1779

then i added a few branches of the toyon.

IMG_1805
woodland greens 2

and, then, the bay branches and fern fronds.

IMG_1695IMG_1889

and, finito!  the inspiration for this arrangement came to me on a hike that we took in muir woods a couple of weeks ago.  it was so beautiful and i realized that i had many of the same plants growing on my hillside.  but find your own inspiration and use what you have available to you.  you could also combine foraged materials with store bought items.  

happy foraging!

xo, c

Monday, December 16, 2013

simple DIY flowers: simple holiday wreath

IMG_1338 copy

this year i decided that i wanted something other that the ordinary evergreen wreath for my front door.  i decided to make my own, but i wanted something simple and quick.  i chose an already constructed grapevine wreath (which is really inexpensive) and then added a some greenery (cypress and silver dollar eucalyptus) and some color (craspedia, thistle and pepperberry).  the cool thing about the grapevine wreaths is that you can you just shove the plant material into the vines instead of having to wire it in.  some of the materials that i used were dried (craspedia and pepperberry) and others were fresh but i knew that that they would look nice when dried (cypress, thistle, eucalyptus).  

IMG_1251

i added the greens first.

IMG_1261

then i sprinkled in the berries and flowers.

IMG_1285IMG_1311IMG_1340IMG_1350IMG_1361

i chose to just cover the top half of the wreath because i liked the look of the bare vines on the bottom.  then i tied a fuchsia ribbon on top to hang it from.  you really could use any dried greenery and flowers (or fresh that will look good dried), as long as the stems are strong enough to push into the vines.  

and that was it - a quick, easy and unique option for the front door (or anywhere) :-) 

xo,

c